Happy Accidents…in the Kitchen

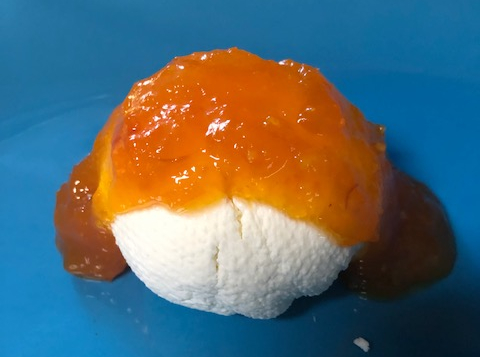
My featured image proves that there are happy accidents in the kitchen.  It’s cheese with a dollop of my APOS jam, i.e. Apricot-pineapple-orange-saffron jam.  While one may want to consume a bite of this with a cracker, I found it wonder to take a small serving and eating it with a small spoon.  Think – small spoon with which one might eat caviar.  Also, it’s great on a nut cracker, which does not overwhelm the delicate flavor of the cheese and the jam.

How did I make the cheese?  That’s the happy accident!  Backstory: I drink lactose-free milk.  I have a favorite brand, but I was at a different grocery store a few weeks ago, and I bought the “store brand” of lactose-free milk.  An ingredient added to lactose-free (lactose is milk sugar) milk is lactase, an enzyme that helps us to digest milk sugar.  Cells in the walls of the small intestine produce lactase.

Well, I was heating up the milk on the stove for coffee.  It separated, just like when you put a rennet tablet in milk you’ve heated to 118 degrees fahrenheit (47.7779 C) for cheese.  Noticing that curds had separated from the whey, I poured it all in a cheese bag.  After squeezing more whey out of it, I had a creamy, solid ball of cheese.  The natural sugars in milk rendered a slightly sweet cheese.  I added salt to the forming curds to give it some body.  Voilà, c’est fromage!

Always looking for yummy happy hour appetizers, I purchased another of the “store brand” of the lactose-free milk, this time from a different store.  I heated it to about 120 degrees F. (48.8889 C), and this time, the curds that separated from the whey were smaller.  Well, I thought a nice dessert cheese would be nice, so I added a small box of lemon flavored gelatin and 6 strands of the wonderful saffron!  I rubbed the lovely orange-red (crimson?) stigma and styles in my hand to release the aroma and flavors.  After I spend a few minutes deeply inhaling the perfume of the saffron, I mixed the gelatin and the saffron gently so as not to disturbed the developing curds too much.

I let the mixture gather, drain, and form in the cheese cloth for about 8 hours.  The result was the most scrumptious, creamy cheese you could imagine.  Quite incredible considering that I did not age it in a dark room surrounded by little pine wood cases (I’m thinking of one of my favorite cheeses, brie!).  It turned out to be a great appetizer with a small glass of sweet vermouth.  Or it could be a small dessert with a small glass of port.

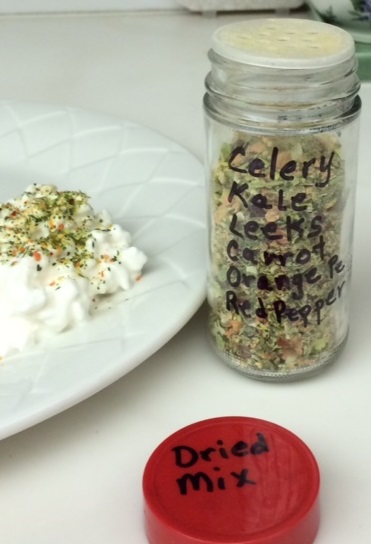
Notice the color imparted by the lemon-flavored gelatin and the orange-red streaks from the saffron.  I’ve used the lemon-saffron combination for Thanksgiving “jello” salad last fall.  Right now, I am thinking about other flavors.  I wonder how blueberry would taste.  I mean, it’s best not to expect, like, Stilton, which goes great with blueberry.  It may be worth a try.

Actually, I found the best cheese cloths are handi -wipes.  I think handi-wipes are a cloth-paper hybrid.  They’re great for a semi-disposable dish  cloth that dries easily to cut down on bacterial build-up in the kitchen.  I use those freshly from the bag – never used.

Now, this is not a happy accident, but my friend, Mirta, asked if I knew how to make lavender honey.  I had some locally-sourced honey, which carries the local pollen, which helps us to build up immunities to those pollens as allergens.  Also, I had some locally sourced lavender from a friend.  I heated the honey, which was starting to crystalize, just enough to make the crystals melt.  Then I crushed the lavender buds to add them to the honey.  I used about two cups of honey and 1/8  of a cup crushed lavender bud and one drop of lavender essential oil, for good measure.  The result was delicious!  It’s great on toast, with peanut butter on bread, and in teas.

The immersion blender helped to whip the honey into a creamy substance while it assured that no lavender buds would get stuck in your throat.

I have more creations from my kitchen, but I will share those later.

Thank you for reading.

Celery and Dehydrated Veggies

Based on what readers are following in this blog, it seems that writing about cooking is a bit more popular, so here goes another entry about food.

If you have a thriving garden, no doubt, you wonder what to do with odds and ends of the vegetable waste.  I have a few ideas for you.

Whether you grow celery or buy it in a store, it can keep feeding you even after you’ve used the stalk, ribs, and leaves for varying recipes.  You can grow your own, for continued use, right in your own kitchen!

Hold your whole celery with the leaves on top.  Cut from the base of the stalks up about 2-3 inches from the bottom.  Put the ribs/stalks in the vegetable drawer of your refrigerator.  I like to wrap mine newly cut celery in a clean dish towel for a dryer storage.

Place that cut base in a small jar filled with water.  After a week, or so, you will begin to see roots sprouting from the base in the water.  When you see many small roots coming off the bottom, you will, also, see small leaves and stalk begin to reach up toward the “sky”.  Either you can use snips of the growing stalk to add flavor to your cooking, or you can plant the rooted base in potting soil.  After a week, or so, the celery will begin to grow taller each day.  You can use those growing celery stalks to further flavor your cooking.  I’ve used my growing celery for about six months.  Each time you cut the growing stalks and leaves, they will keep growing.

Those small stalks are tender, and work well in tuna salad, stir-fry, and that ubiquitous, aromatic trio of carrot, celery, and onion.  French cooks call it “mirepoix” (meer-pwah), Spanish cooks call it, “Sofrito” (so-free-toe), and Italian cooks call it Buttuto (boo-two-toe) or Soffritto. This lovely “trinity” pulls the best of flavors from the other ingredients included in your cooking and makes a lovely base for many soups.

Another thing that I do when I get to the end of my vegetables, if I have more than I need, or if I don’t think I will use the veggies before they go bad, I chop them into small pieces and put them in my food dehydrator. 

 Once the vegetables are dehydrated, I grind them in my coffee grinder (used only for herbs/spices) and process until the dried mixture resembles small flakes. 

I put the vegetable flakes in a small jar with a shaker top (used herb bottle/jar) for use in a variety of food preparations. I have some favorite combinations: 

General Dried Blend: 

  • Celery 
  • Kale 
  • Carrots 
  • Leeks 
  • Orange Peel 
  • Sweet Red Pepper 

This blend goes well in soups, on cottage cheese (for a Bourisin Cheese taste), on eggs, etc. 

 My next favorite blend I like to use in seafood soups, on fish, etc. 

Seafood Blend: 

  • Fennel bulb 
  • Celery 
  • Carrot 
  • Lemon Peel 
  • Sweet Red Pepper 

 Drying veggies takes about 24 to 48 hours to dry on the “dried vegetable” setting of the dehydrator. You can be creative in the kinds of vegetables that you dry for your mix. You can also dehydrate veggies without grinding them for use in soups. 

As mentioned previously, with the Mirepoix, I make a dehydrated Mirepoix, and I add mushrooms to the trio before drying.  The mushrooms add extra glutamate for more enhanced flavor in cooking.  I like to use this mix in my marinara or pizza sauces.

Somehow, I think creating dishes in the kitchen becomes a sort of therapy that feeds my artistic side.

Thank you for reading.


Financial Opportunities and Micro Loans

Some friends and I were discussing building financial opportunities for women.  It made me think of the micro-loans that were championed by the Grameen Bank many years ago.  One of my colleagues, a Bangladeshi engineer, was personal friends with Grameen founder, Muhammad Yunus, Nobel Laureate.  The concept of micro-credit and micro-finance has worked in many places to help people build financial security.

Our discussion centered on ways to help women, specifically, to build financial security.  It made me think of a study trip to Mexico, a few years ago, when I was able to learn from people who were using micro-credit to run very small farms called, ejidos (Eh-hee-tho).  Looking back at my journal notes, I will describe their process for growing tomatoes (tomates).

We visited several farms in the county (municipio) of Ayala.  An ejido farm can be compared to a parking lot. When you go to a parking lot, you just know there will be a place for you to park. And as long as you do not abuse your parking privileges, you can continue to park in a spot in that lot. An ejido farmer does not own his/her “lot”, but as long as he or she wants to farm there, and as long as it is used properly, the farmer can be on the land indefinitely. Like paid parking lots, there are only small fees to be paid, or food can be supplied to municipios.

My colleagues and I visited a wonderful tomato farming operation, which had been in production for about five months. It took about one month to begin to produce significant quantities for sale. Before entering the facility, we had to step inside a sunken, concrete box holding chlorine bleach.
Situated on approximately one-fourth hectare, which is about 2,500 meters, which is about .62 acres, is a screen-enclosed structure holding about nine-thousand tomato plants. The plants’ soil and root systems sit inside heavy, pliable, black plastic bags, which are approximately 13 inches in diameter and 14 inches high. The stems of the plants are three to six inches in diameter. The plants vine up strings rising 12 feet above to horizontal wires running parallel to each row of plants. The tomatoes nearest the bucket-like bags, holding the dirt and root systems, ripen first. As tomatoes are harvested, the green tomatoes nearest the horizontal wires are lowered to run more parallel with the ground. Then the top of any given plant will be hanging over buckets 10 spaces away. Every 15 days, the strings are lowered, and the tomatoes nearest the ground ripen first. This Loreto-variety of tomatoes takes a lot of nitrogen, we were told. If you want to see pictures, please let me know. You would love seeing this operation.
The plants take 20-thousand liters of water a day, which is about 5,265 gallons. The farmer harvests 200 boxes of tomatoes per week. The boxes held about two bushels, which is about 106 pounds. There is not much exporting, but this operation supplies several grocery stores (tiendas) weekly. The picked fruits are sold to the stores, and the fallen fruits are sold in the barrios (neighborhoods).
The producer told us the next thing to be learned is composting so that something useful can be done with the organic waste, which is one other by-product of this operation.

All this was built from a micro-loan, and the farmers told us they thought they’d begin to see a profit just after the second round of purchases.

Here’s another:

“EJIDOTARIAS” (EH-HEE-THO-TAR-EE-AHS)
Don’t forget to roll the “Rs”.  Okay, so I already introduced the ejido farm producer. The community or municipio owns the land. You stake a claim, of sorts, to some land, and you farm it. As long as you do not abuse the land or other farms around you, you can work that land as long as you like. There is a small usage fee to help the community. The county (municipio) government usually helps with initial seeding, reclamation, and improvements.

We visited the farm of two women near the minicipio of Ayala, state of Morelos. The señoras farmed their ground together. They produced corn, green beans, squash, and sugar cane. Their corn seed came from the U.S., and they grew both grain (maiz) and sweet corn (elote) – pronounced “my-eese” and “eh-lo-tay.”

Farming 3,000 feet above sea level, the ladies planted, irrigated, and harvested by hand and with the use of oxen and horses. Small irrigation ditches ran through the land. It is up to the farmer to flood her fields from the ditches with dams and canals. They farmed four hectares (about 10 acres) per year. It costs about 5,000 pesos per hectare (2.48 acres) including 200 pesos for fertilizer and 350 pesos for insecticide. They pay their water usage annually. The ladies gave us an estimate that it took about 29,000 pesos to get their produce to the market. That is about $2,900.

In the ejido system, producers help one another plant and harvest. For example, the sugar cane was harvested with a machete. It takes strong arms to swing a machete. The crops go to market in Mexico City. Visiting this particular farm held a few contradictions. Everything was done by hand, which took us back in time. The power lines above had electricity surging through them, audibly. That brought us back to reality.

Thank you for reading.