Hummus and Flatbread

I am passing the week with my 82 years old brother in law (Bill) who is in treatment for cancer.  While he does not want to be “taken care of”, I cannot help but want to cook, though I am not surrounded by the things in my own kitchen.   Fortunately, Bill and his late wife stock a well-used kitchen, as far as cooking utensils are concerned.  The ingredients in the kitchen are rather dated, so I am pleased to explore the groceries of Southern California (SoCal).  My focus turns on nutrient-rich foods served in small courses, more like appetizers.  My husband and Bill’s late, Hawaiian, mother would call them “poo-poos”.  Now before you snicker, Islanders serve “Poo-Poo Platters” much the same way Spaniards serve “tapas”, in other words, small bites.

Lucky for me, I once worked with an Egyptian woman who taught me her version of hummus, and it continues to be my favorite hummus, to this day.  My first challenge is that Bill declared to me that he “dislikes” hummus and chick peas.  I said, “Fine, then I’ll make it for us!”.  So, I will let you know how I make hummus and flat bread.

I like to cook with fresh ingredients.  No, I did not grow my own garbanzo beans, but I do purchase about 10 ounces of the dried beans.  I cook those in boiling water which as been generously salted until they are soft.  Once those are cooked and cooled, I am ready to proceed.  Oh, yes!   I don’t like the high price of tahini, or sesame paste, so I make my own.

Tahini:

1/2 cup raw sesame seeds.  Put them in a small, dry skillet and heat them, stirring often, until they are brown and toasted.  Notice in the photo, what “browned” sesame seeds look like.

Once the seeds are toasted, cool them.  The next step is to grinds the toasted sesame seeds.  I have a coffee grinder that I use exclusively for spices, seeds, and other things I need to grind.  I do not grind coffee in this grinder.

When the ground seeds resemble a paste, add olive oil to support a thick paste consistency.  Again, notice the tahini in my pictures.

Hummus:

Blend – 1-2 cups soft garbanzo beans (chick peas), 4 gloves of garlic, 1/4 to 1/2 Tahini, Salt, pepper, chili powder, cumin, the juice of half a lemon, and plenty of olive oil.  Blend until you have a nice consistency, to your taste.  ( I hope I remembered all the ingredients!)

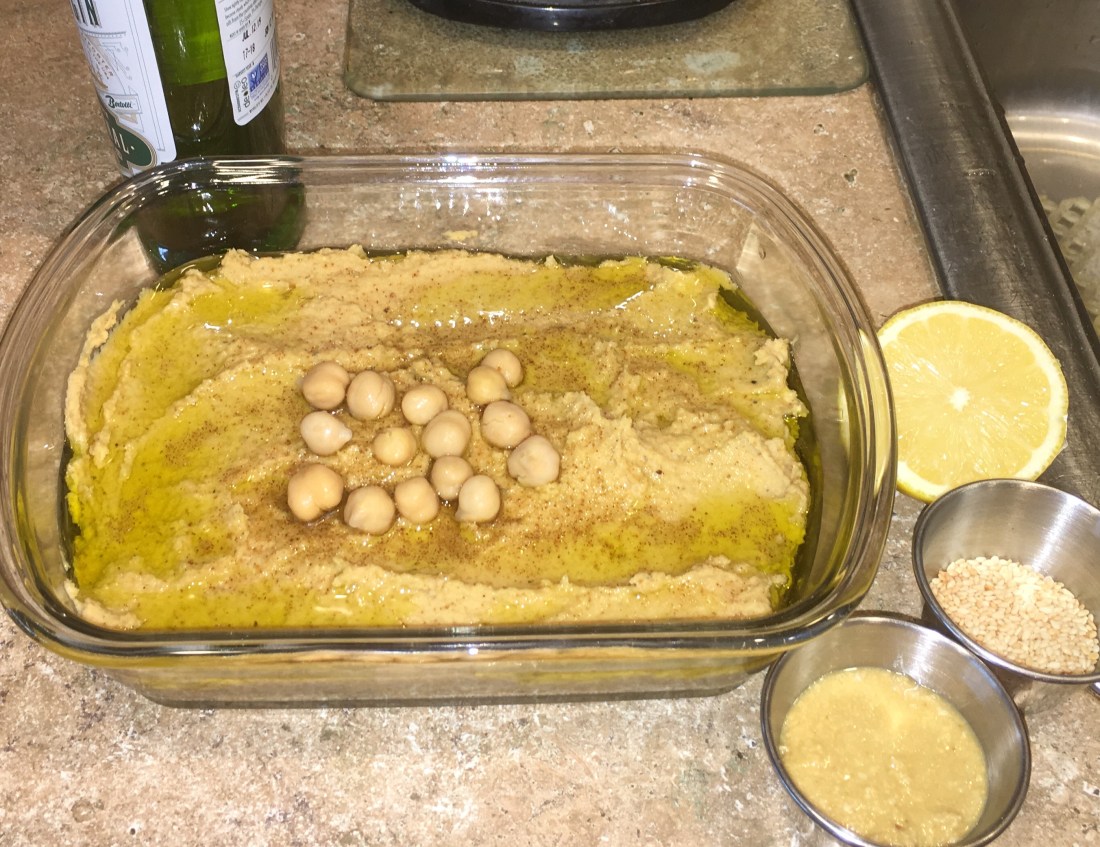
Spread the hummus in a walled plate or wide glass pan.  Drizzle olive oil and sprinkle smoked paprika on top.  I like to decorate the middle with a few, set aside, beans for garnish.  Serve with flat bread.

The whole presentation of hummus and flat bread

Flatbread:

I just use a simple bread recipe of flour, yeast, a little sugar, salt, and a little oil.  Make a good dough, and let it rise for a bit (1/2 hour).

Form the dough in small rounds, about the size of a golf ball.  Roll out and cook on a hot griddle.  Cook on one side, and when you flip it to cook on the other side, a nice bubble will form.  Then you can call it a “pita”!.  I like to cut the round flat bread into fourths.

Serve with the hummus , which is high in fiber, protein, and good fats, with the olive oil.  The garlic is good for you, too.

Oh, I should tell you that Bill, who earlier said he dislike hummus, had three servings of his “small” bites!  Turns out he loves homemade hummus!  Things are always better when we make them from scratch!  I should mention that Bill likes herring in sour cream, so we served the hummus and flat bread with a side of herring in sour cream, to take from many cultures today.  The color of the food would have looked better on a darker-colored plate, but I made do with what I had.

On the plate

Enjoy, and thank you for reading.

Eggplant Parmigiana – Made Simply

I might be a little brain dead at the moment, so I’ll just write about this evening’s dinner.  Again, I didn’t set out for this to be a blog only about food, though its preparation wanders into a sort of therapy for me, sometimes.  I have many topics on which I want to share.  I don’t want to be boring, however.  Sooner or later, I plan to discuss food in books a bit more along with other points of interest such as music, film, history, culture, and themes of social justice.  Let’s continue with food, for now.

My all-time favorite cookbook, given to me by my friend, Lynn, is more of a story book, called There’s a Tuscan in my Kitchen, written by restauranteur, Pino Luongo, who hails from Tuscany (Toscana) region of Italy.  Tuscany sits on the same latitude as Corsica (birthplace of Napoleon) and would be considered the upper part of the “boot” (but not the upper flaired part!), that is Italy.  The Tuscan region is on the Ligurian Sea.  Luongo’s book tells a story of each featured dish. My favorite part is that he does not give the reader/cook ratios and measurements for each dish.  He trusts the reader to make his/her own judgement.  He does list the ingredients based on where one might find them: pantry, cold storage, and market.

Yes.  I love Luongo’s book, but my food travel, this evening, goes north to Parma!  This evening’s menu: Eggplant Parmesan on linguine (literally, “little tongues” from the Liguria region west of Parma).

Since my basil garden continues to be quite prolific, I have a goal of incorporating the “mint cousin” into as many dishes as possible.  First, however, I sliced the eggplant, and salted it on each side before laying the slices on paper towel to drain from lunch time to evening.

eggplant-draining.jpg

My sauce:

  1. 1 can whole tomatoes
  2. 1 very large bunch fresh basil leaves
  3. 4 cloves of garlic
  4. ¼ yellow onion
  5. 1 TBS mix of dehydrated and ground onion, celery, and mushroom (my own creation)
  6. Salt and pepper
  7. ¼ cup red wine

Blend all ingredients, then pour into cooking pot and simmer for three- four hours (I put these ingredients in the pot when I came home for lunch and simmered on low until I returned).

Put 2 eggs into a pan.  Dip the sliced eggplant in egg mixture then in flour before placing in hot oil to fry until golden brown.  Place browned slices into a glass cake pan in one layer until all slices have been browned.

Pour your simmered red sauce on the browned eggplant slices, then cover with Parmesan cheese and mozzarella.  Bake in a 350-degree oven until the sauce is bubbly and the cheese is browned.

EPP in the pan

Serve the eggplant and sauce on top of linguine or spaghetti.  Enjoy with a salad and a beverage of your choice.

Thank you for reading!


Saturday at Home and Creating in the Kitchen

We have not been home for many weekends, so this weekend, we stayed home.  Dale mowed the ever-growing lawn because of an unusually wet July.  The wet July also gave rise to ants!  I cleaned shelves, placed oil of peppermint in every nook and cranny to ward off the little creatures. We woke up to clear counter tops and shelves in the kitchen, so those essential oil home remedies work!

All that work in the kitchen did not stop me from cooking.  I love to cook, and the summer’s bounty contributed greatly to locally-sourced meals.

So, Saturday lunch was simple.  Menu:

  • chicken fried venison steaks
  • baked and mashed sweet potatoes
  • Spanish rice made with a wild/sweet/black rice mix.

I live in a region of Kansas popular for its hunting opportunities.  Hunters come from other countries and from different corners of the U.S. to hunt for pheasant, quail, and deer in this region.  Having grown up in Colorado, I know the wonders of great-tasting venison.  However, I am loathe to say, that Kansas venison may be a bit better.  Colorado deer resort to eating sage and lichens when the snows are too high for their usual forage.  When someone says, “This venison is strong!”  He or she is reacting to the tastes of sage and lichens, for example.  My Native grandmothers would crush juniper berries and rub it onto the meat, and that neutralized the “strong” flavor in any wild game and old mutton.  Try it sometime.  It really works.  Kansas venison does not need juniper berries, because this wild game feeds on corn and sorghum, which makes for wonderful tasting meat!

Okay.  How did I prepare this meal?

Before frying my venison in a combination butter and sunflower oil, I dusted it with sprouted wheat flour, and sprinkle some seasoned salt.

Chicken fried venison.jpg

I like sprouted wheat flour from my childhood.  The grandmothers used it cooked as a gruel with milk and sugar.  They did the same with ground blue corn, and called it, “chackawe”.  The Spaniards called it, atole. It was said to fixed “what ailed you!”

The sweet potatoes were simply baked.  I scraped the baked flesh into a bowl, added salt, ¼ teaspoon of brown sugar, and butter.  I mashed them and served with a pat of butter.

This version of Spanish rice:

In a tablespoon of oil, sauté onions, yellow sweet pepper, (some of my dehydrated tomatoes, onions, and green chili), and 1 cup of rice until veggies are soft and the rice is browned.  Add about 2 cups of chicken stock and bring to a boil.  Lower heat and simmer for up to 40 minutes until liquid is absorbed.  In the end, I didn’t like the rice mix, because the wild and brown rice took longer to cook than the sweet rice.  It was a little hard to judge.

I looked for the history of “Spanish Rice”, but I just kept finding recipes for “Mexican Rice”.  Having eaten my way through Spain, about 10 years ago, I wonder if what we call Spanish rice, is a form of Spain’s “paella” (pie-yay-yah), which is rice, veggies, fish, sausage, chicken, and flavored with saffron.  So, since saffron was not readily available when Spain was colonizing what is now New Mexico and, a bit later, Meso, Central, and South America. What we cook today, may be a cousin to paella.    I’ll keep looking.  If you know, let me know.

So, that was lunch.  We ate a wonderful supper (dinner), too.

Menu:

  • Fish tacos with marinated cabbage topping
  • quinoa garden salad

Here’s how I prepared it.

2 cod fillets – Sautéed in ghee (clarified butter) and olive oil and seasoned with a dried “fish tacos” seasoning.

I sliced the cabbage and tossed with olive oil, sherry vinegar, smoky salt and garlic powder.

We grilled the locally sourced corn tortillas made freshly on a daily basis.

The quinoa salad:

  • 1 ½ cups cooked quinoa (keen-wah) – a lovely South American grain
  • 3 ears of grilled corn cut off the cob
  • 1 ½ cups black beans
  • 1 large grilled zucchini (not too large!)
  • 5 green onions
  • 2 TBS snips of celery (off my celery plant from my window pot)
  • 1/2 cup thawed sweet yellow and red pepper (I had thawed my chopped/frozen pepper for the noon meal.  This was the other half cup).

My dressing for this salad: olive oil, lime juice, sherry vinegar, seasoned salt, chili powder, and cumin.

Toss and chill before serving.

Fish Tacos and quinoa salad

Try these meals.  Let me know what you think.  If you don’t have one or more of the ingredients, don’t hesitate to substitute.  It’s fun to experiment.  I don’t use a lot of measurements.  Use what works for you.

Thank you for reading.


Regional Foods of Patabamba – Peru

A few years ago, I went on a study trip to Peru.  I wrote about it previously.  Of course, I’m always up for a new adventure in eating, though I love interacting with people with different backgrounds from my own. (Which is every day, really!  I don’t have to go to another country to do that!). My study group and I took many trips in-country, so I will talk about those from time to time.  This story begins in Cuzco, and it includes food, too!

The Cuzco church bells pealed at 4:00 a.m.   We ate a lovely breakfast of ham, cheese, eggs, fruit, granola made with puffed millet in place of our traditional oatmeal, liquid yogurt, and hot espresso.  Espresso is the only type of coffee served in Cuzco!  Having only been a consumer of coffee for a few years, this was strong for me, but it proved to be beneficial in the high altitude.  Cuzco is considered the Peruvian Andes and is 11,152’ altitude.  Coming from a mountainous region in Colorado, I adjusted quite well.  As for the espresso and any coffee in Peru, I must say that there was no such thing as a bad cup of coffee in Peru.  After a lovely breakfast, we chewed on some coca leaves for good breathing, and then, we boarded the bus to Patabamba.

Patabamba, in Quechua, means “upper flat.  Originally, it was Patapompa, but the Spanish colonizers changed it to Patabamba.  From what I could gather regarding Quechua, it is a complex language, which was largely replaced with Spanish after Spain’s invasion in the 15th Century.  Many of the remote villages around Cuzco are functionally monolingual speakers of Quechua.  It is a beautiful language with only three vowels (i, a, u), and in some words the vowels are completely devoiced (silence, a stop, or a sort of throaty sound).  I was able to observe the language in action when village members relayed instructions to one another as they prepared our most sumptuous and interesting meal of the whole trip. At first, I did not understand that the, aforementioned, stops, hisses, and throaty sounds were part of the language.  Then after, I learned to listen for the “devoiced” part of the language that is Quechua (Ketch-wah).

Our menu of lamb, chicken, llama, potatoes, sweet potatoes, lima beans (cooked in their pods), plantain, and blocks of farmer cheese were baked in a rock “oven” especially built for the occasion.   We watched as the hole was dug, and then lined with the rocks.  The most impressive was the dome built by the large stones leaning against each other. The crowing touch came when the “keystone” was placed in the ground oven.

Peru Oven

The domed rock oven was filled with wood fuel and burned until the rocks were hot.  When the rocks reached the target temperature, the dome was deconstructed by first removing the cap stone which held all the stones in place.  The rocks that made the dome were removed, and the raw foods were placed on the hot stones.  The cheese was wrapped in brown paper before being place on the other ingredients.  When all the food was in place, green branches with yellow flowers still in place, were spread on top of all the foods.  Then large sheets of heavy plastic were laid out on the green branches.  Then the moisture-rich soil dug to make the cooking pit was spread out on the plastic until nothing, but soil was visible.  The food stayed in the “oven’ for 35 minutes, and voilà!  We ate the most agreeable meal with cups of coca tea to wash it all down.  The meats, plantain, and vegetables cooked to perfection.   We ate with our hands.  I ate my potatoes with the peelings still intact, and I noticed that the villagers peeled their potatoes.   It was my favorite meal of the trip.

Peru cooked in Patabamba

While the meal was cooking, my fellow travelers and I met the elders of the village.  The elders, male and female, invited us to try on their beautifully dyed and woven dresses, ponchos, capes, and hats for photo opportunities.  One of the featured photos in a past blog was me and one of the elders.

After interacting with the village elders, we went for a walk to gather plants and flowers.  That was followed by a lesson on the plants used for dying wools for weaving.  The flowers gathered that day became the dyes of brilliant reds, yellows, and blues from which all other colors were made.  After spending a fine luncheon with the villagers, they set up a store for us to purchase handmade clothing, wraps, and hats.

What struck me most was the happiness of the people.  They seemed to be quite contented.  As they told us about their plans for promoting the village for tourism, which includes home-stays, I wondered if the influences that would inevitably follow would interfere with the peace they appeared to possess.  I wonder how they are faring these few years later.

Thank you for reading.


Pizza: Origins of the “Humble Pie” and Whipping up a Pizza After Work!

According to the History Channel’s website, there’s a great history of the pizza.  In the town of Naples, in the 1700s, the working class devised a way to get eat large amounts of calories in an easy way: flat bread with oil, cheese, and other toppings.  It was an inexpensive and portable meal that could be consumed in haste.  Seen as a food for the lower classes, pizza became popular when Queen Margherita visited Naples in 1889, and fell in love with the “pizza mozzarella”, which now bears the name of the young queen. Word has it that the queen, especially, liked the fact that the pizza bore the colors of her country’s flag!

Pizza can be made quickly, after work, for a delicious and special meal for you, your family, or for friends. You don’t need fancy ingredients, just be creative with what you have.

A few days ago, I told you about my windfall of basil and about dehydrating veggies for use as seasonings in my cooking and baking.  Last evening, I fixed yummy pizzas after work.

Pizzas from scratch are quick and simple, and the activity can easily contribute to a fun party with guests.  All you have to do, is make the dough, and seal it in a large bowl, for up to an hour, until you’re ready to divide it for your visiting pizza makers.

For my pizzas, last night, I made a pesto and added extra ingredients to make it more zippy, than usual, for the sauce.  It was delicious for lunch, today, too!  We ate it cold!

Pesto Pizza Sauce:

One bunch basil (about 1 cup of leaves)

¾ cup olive oil

¼ cup parmesan cheese

¼ cup of ground hazel nuts with two juniper berries (I did not have pine nuts, so improvised)

3 cloves garlic

1 tablespoon of dehydrated onion, celery, tomato, and chili peppers

Blend to a liquid consistency – set aside

Pizza dough:

2 cups flour

Warm water

¼ cup Honey or sugar

Mix and wait until bubbly

When it’s bubbly, add 1 tsp salt, 1 tsp salt, and 1 TBS oil

Add enough flour to make a thick dough – let rest

Knead and add enough flour to make a nice dough

Roll out flat and place on your gas grill to set the pizza dough – turn over to slightly brown on the other side. Grilling the dough also gives it a wonderful, smoky flavor.

Remove from heated grill and spread pesto pizza sauce on browned pizza dough, add cheese and other toppings.  Place back on grill until finished.

Enjoy with a nice salad and a glass of wine.

Thank you for reading.

Reference:

Turim, G. (2012). A Slice of History: Pizza Through the ages. Access date: August 10, 2018,

https://www.history.com/news/a-slice-of-history-pizza-through-the-ages


Celery and Dehydrated Veggies

Based on what readers are following in this blog, it seems that writing about cooking is a bit more popular, so here goes another entry about food.

If you have a thriving garden, no doubt, you wonder what to do with odds and ends of the vegetable waste.  I have a few ideas for you.

Whether you grow celery or buy it in a store, it can keep feeding you even after you’ve used the stalk, ribs, and leaves for varying recipes.  You can grow your own, for continued use, right in your own kitchen!

Hold your whole celery with the leaves on top.  Cut from the base of the stalks up about 2-3 inches from the bottom.  Put the ribs/stalks in the vegetable drawer of your refrigerator.  I like to wrap mine newly cut celery in a clean dish towel for a dryer storage.

Place that cut base in a small jar filled with water.  After a week, or so, you will begin to see roots sprouting from the base in the water.  When you see many small roots coming off the bottom, you will, also, see small leaves and stalk begin to reach up toward the “sky”.  Either you can use snips of the growing stalk to add flavor to your cooking, or you can plant the rooted base in potting soil.  After a week, or so, the celery will begin to grow taller each day.  You can use those growing celery stalks to further flavor your cooking.  I’ve used my growing celery for about six months.  Each time you cut the growing stalks and leaves, they will keep growing.

Those small stalks are tender, and work well in tuna salad, stir-fry, and that ubiquitous, aromatic trio of carrot, celery, and onion.  French cooks call it “mirepoix” (meer-pwah), Spanish cooks call it, “Sofrito” (so-free-toe), and Italian cooks call it Buttuto (boo-two-toe) or Soffritto. This lovely “trinity” pulls the best of flavors from the other ingredients included in your cooking and makes a lovely base for many soups.

Another thing that I do when I get to the end of my vegetables, if I have more than I need, or if I don’t think I will use the veggies before they go bad, I chop them into small pieces and put them in my food dehydrator. 

 Once the vegetables are dehydrated, I grind them in my coffee grinder (used only for herbs/spices) and process until the dried mixture resembles small flakes. 

I put the vegetable flakes in a small jar with a shaker top (used herb bottle/jar) for use in a variety of food preparations. I have some favorite combinations: 

General Dried Blend: 

  • Celery 
  • Kale 
  • Carrots 
  • Leeks 
  • Orange Peel 
  • Sweet Red Pepper 

This blend goes well in soups, on cottage cheese (for a Bourisin Cheese taste), on eggs, etc. 

 My next favorite blend I like to use in seafood soups, on fish, etc. 

Seafood Blend: 

  • Fennel bulb 
  • Celery 
  • Carrot 
  • Lemon Peel 
  • Sweet Red Pepper 

 Drying veggies takes about 24 to 48 hours to dry on the “dried vegetable” setting of the dehydrator. You can be creative in the kinds of vegetables that you dry for your mix. You can also dehydrate veggies without grinding them for use in soups. 

As mentioned previously, with the Mirepoix, I make a dehydrated Mirepoix, and I add mushrooms to the trio before drying.  The mushrooms add extra glutamate for more enhanced flavor in cooking.  I like to use this mix in my marinara or pizza sauces.

Somehow, I think creating dishes in the kitchen becomes a sort of therapy that feeds my artistic side.

Thank you for reading.


It’s Basil Time!

After work today, I returned home to realize that my basil plant needed harvesting, again.  The climate in my usually draught-stricken part of the state has been especially wet this summer.  The farm manager, where I work, told us that the average precipitation in July, for this region, hovers around 2.5 inches of rainfall.  As of last week, we had received 8.98 inches of rainfall, and the basil is loving it! I hear other gardens are doing well, too.  Let’s talk about basil.

If you read about the healing properties of basil, you know that it’s an anti-viral.  So, let’s look at pesto.  I think it could be a near perfect food, in my estimation, because of the ingredients.  It’s full of basil with its “green” power, protein from the pine nuts and the parmesan cheese, garlic is known as a vasodilator, and extra virgin olive oil is known for its healthy mono-unsaturated fats, antioxidants, and anti-inflammatory benefits.

Here’s how I make pesto:

1 very, very large bunch of fresh basil leaves

5 large cloves of garlic (Glad we don’t live in Chicago in the 1920s when one could not go into public for 24 hours after consuming garlic!)

½ cup grated parmesan cheese (more or less)

½ cup pine nuts (piñon nuts) (more or less)

Enough extra virgin olive oil for a nice consistency

Of course, I’m not exactly sure about the measurements.  I just add them until it “looks right”

Throw it all in a blender, and blend into a pourable consistency, or thicker, if you like.

It’s best to freeze it for a lovely green treat in the winter months.  It looks just as green the day you take it out to thaw as the day you put it in the freezer!

So, what do you do with pesto?

It can be tossed in any pasta salad or anti-pasti salad.  Just the other day, I cooked some whole wheat spaghetti, and I cooled them.   To that I added grilled zucchini, onions, carrots, corn (on the cob), and eggplant (cubed after grilling).   After the veggies have cooled, I added them to the cooled pasta.  Then I tossed all with cubed mozzarella.  Grilling the veggies added a special smoky flavor to the “salad”.  Then I added the fresh, green, thawed pesto with just a bit of balsamic to add that tang.

Another is caprese salad, as shown in the featured photo.  I had fresh garden tomatoes, so they called for basil leaves, fresh mozzarella (smeared with pesto), and tomato.  Don’t you just love the colors in the photo.  Do you think caprese salad was made to look like the flag of Italy?  I like to drizzle a little balsamic.  We ate a lovely supper, tonight, of the caprese salad, with canned sardines, and saltine crackers.  It was a most satisfying meal with an accompanying glass of Sauvignon Blanc.

Thank you for reading.

Traveling Alaska with Friends and Granddaughter!

About four years ago, we set out on an adventure to travel Alaska in recreational vehicles with a total of 16 travelers, one of whom was our, then, 6 year old granddaughter.  I will call her “Ditto”, since she will play an important role in this story.

Well, we have some close friends with whom we have traveled to Mexico, the Texas Gulf Coast, and other place not-so-far-away.  The trip to Alaska was about a year in the planning.  My friend, Kathy, has a knack for organizing trips, for which I”m grateful since I don’t like that kind of detail.

All but four of the travelers flew to Alaska.  The other four drove to do some sight-seeing along the way.  Our flights and car trip converged in Anchorage, where we rented the recreational vehicles and began the drive across the state, as best can be done in two weeks.

This story focuses on our first stop, from Alaska, was the Kenai Peninsula and Resurrection Bay.  It was overcast and cool, which was a nice welcome coming from July the Midwest.  July in southern Alaska was wonderfully wet, and the air smelled fresh and moist!  Part of the group went fishing for halibut and salmon, which was prepared in the smoker that Mark brought from the “Lower 48” in their SUV.  We enjoyed the freshness of the fish prepared other ways, too!

One of the most exciting activities we shared was that of teaching “Ditto” how to harvest mussels during low tide.  After gathering the bi-valve moluscs, we cleaned and “de-bearded” them.  Inspecting the mussels before cooking is important.  Any that are open already, should be discarded.  That indicates a dead organism.  When your mussels are cleaned and inspected, set those aside.  I like to soak them in fresh, cool water as I’m preparing the “soup” in which I cook them.

Put a pot on the stove, saute four cloves of garlic in 3/4 stick of butter.  When the garlic is soft, add two cups of white wine.  Once the wine, butter, and garlic are simmering, add the cleaned mussels to the broth.  Put a tight fitting lid on the pot, and let the mussels simmer for 10 – 15 minutes.  Remove the lid, and you should see that all the mussels are opened to reveal the steamed moluscs.  Discard any that did not open.  That means they are not edible.

Eat the mussels with crusty French bread, which sops up the broth!  Our granddaughter is now 10, and still loves having mussels as a treat when she’s with us.  “Ditto” is seen in the feature photo enjoying her third bowl of mussels of the trip.  I love cooking and camping, especially when I get to do those with the people I love.

Thank you for reading.